 This picture describes my life right now perfectly. There are simply not enough hours in the day. Those who read my blog regularly (I know there aren't many) have probably noticed that I don't post often. I just haven't had the time. I have 3 small kids. My oldest is four, so they are all still very dependent, and require a lot of time and attention. I was very excited about this blog when I started it, and had plans to update a couple times a week with a new project idea. I have so many ideas in my head, and no time to do them, which is frustrating to me. For now, I have decided that the blog will have to wait. I need to pay attention to my biggest priorities, and not worry that I'm not keeping the blog updated. Hopefully I will have time to keep it up more regularly in the future. Thanks for reading and participating! It has been fun!
Thursday, November 5, 2009
Not Enough Hours...
This picture describes my life right now perfectly. There are simply not enough hours in the day. Those who read my blog regularly (I know there aren't many) have probably noticed that I don't post often. I just haven't had the time. I have 3 small kids. My oldest is four, so they are all still very dependent, and require a lot of time and attention. I was very excited about this blog when I started it, and had plans to update a couple times a week with a new project idea. I have so many ideas in my head, and no time to do them, which is frustrating to me. For now, I have decided that the blog will have to wait. I need to pay attention to my biggest priorities, and not worry that I'm not keeping the blog updated. Hopefully I will have time to keep it up more regularly in the future. Thanks for reading and participating! It has been fun! Monday, October 26, 2009
My Newest Love: Blurb.com
I am soooo behind on my scrapbooking! Isn't everybody? For me it is an overwhelming task that I will never be done with. I keep saying "When I have time, I'll do it". I have never found the time, and I'm at least 6 years behind. There's a point where you just want something done, and I have reached that point. Maybe someday I'll take the time to make my pages cute and "scrappy", but for now, I have discovered blurb.com.
I heard about blurb.com awhile ago, and put on my list of things to look into. Last week I finally got around to looking at it, and I'm hooked! Blurb.com is a bookmaking site. You just have to download their free software, choose a template, and drag and drop your photos and text. You can even put your blog in book form with blurb.com. The pricing is great. You couldn't print off pages you digiscrapped for as cheap as the printing is on these books. And from what I hear, the quality is fantastic. I haven't ordered mine yet, but I'm so excited to finish my first book, and receive the finished product! Catching up will be so much easier and not so overwhelming now! Check it out! www.blurb.com
I heard about blurb.com awhile ago, and put on my list of things to look into. Last week I finally got around to looking at it, and I'm hooked! Blurb.com is a bookmaking site. You just have to download their free software, choose a template, and drag and drop your photos and text. You can even put your blog in book form with blurb.com. The pricing is great. You couldn't print off pages you digiscrapped for as cheap as the printing is on these books. And from what I hear, the quality is fantastic. I haven't ordered mine yet, but I'm so excited to finish my first book, and receive the finished product! Catching up will be so much easier and not so overwhelming now! Check it out! www.blurb.com
Wednesday, October 14, 2009
Refashioning a Child's Shirt to a Dress
Does your daughter have shirts with stains on the bottom? Use it to make a cute dress! This is a quick and easy project, and it's always great to reuse things. My daughter wants to be Strawberry Shortcake for Halloween, and this dress is part of her costume. Now I only need to make a hat and shoes, and her costume will be complete!
 Here is what you need to make it:

Next, get your fabric out, and cut a shape like this (cut 2). Make sure the top of the skirt piece is 1/2" wider than the shirt on both sides to allow for seam allowance. Be sure to measure your little one from where the shirt ends to where you want the dress to fall and then add 1" to the length to allow for seam allowance.

Put right sides together, and sew along the sides of the skirt with 1/2" seam allowance.
Next, put right sides of the shirt to right sides of the skirt, and pin, lining up the side seams.

Hem the bottom of the skirt. There really isn't a science to this. I just rolled over 1/2", rolled 1/2" again, and sewed, rolling as I went. You can also use the iron to fold the fabric before sewing.
 You're done!

 Here is what you need to make it:
- Child's shirt
- 3/4 yard fabric
- Scissors
- Thread
- Fusible Interfacing (if you are going to applique)
Cut the bottom off of the shirt. You can cut it anywhere you want depending on what you want your dress to look like.

I didn't take pictures of the applique process, but I'll explain it. This is a great way to cover up stains. First, cut out the shapes you want. Get some fusible interfacing (I use Heat 'n Bond Light in the purple packaging). Following manufacturer's directions, fuse the interfacing to the fabric pieces. Peel off the paper, place the pieces on the shirt, and iron them to the shirt, again following manufacturer's direcions. Once your shapes are on the shirt, sew as close to the edges as you can.

Next, get your fabric out, and cut a shape like this (cut 2). Make sure the top of the skirt piece is 1/2" wider than the shirt on both sides to allow for seam allowance. Be sure to measure your little one from where the shirt ends to where you want the dress to fall and then add 1" to the length to allow for seam allowance.

Put right sides together, and sew along the sides of the skirt with 1/2" seam allowance.
Next, put right sides of the shirt to right sides of the skirt, and pin, lining up the side seams.

Hem the bottom of the skirt. There really isn't a science to this. I just rolled over 1/2", rolled 1/2" again, and sewed, rolling as I went. You can also use the iron to fold the fabric before sewing.
 You're done!
Friday, October 9, 2009
So Busy!
I know I haven't posted in awhile. I have been so busy! Less than 2 weeks ago, I was asked to do a craft fair that started yesterday. I have been working day and night. In a week and a half, I have made 35 pairs of baby shoes, 11 dresses, and 15 hair bows. I can't believe I did so much! Despite the stress of it all, it has been fun, and I am re-evaluating my decision to only sell patterns in my etsy store. I might start putting a few listings with shoes, dresses, and bows in my shop, so watch for them. Now that I have things finished for the craft fair, I can get back to my own projects. I have some fun ideas, and I hope to start working on some of them next week.
 All 35 pairs of shoes ready to go to the fair!
  My favorite pair of shoes. If they don't sell, I'm going to make some just like it for my baby.
 One of my pillowcase dresses
 Cute little candy corns
 All 35 pairs of shoes ready to go to the fair!My favorite pair of shoes. If they don't sell, I'm going to make some just like it for my baby.
I love how these shoes turned out. If I had a baby boy, he would definitely have a pair of these!
 One of my pillowcase dresses
 Cute little candy corns
Saturday, October 3, 2009
Winner!!!
Thanks to everyone who entered my giveaway! We have a winner. I used random.org so that the results are truly random. The winner is #1, Valerie.
Valerie said...
Ohh I would love some! They are so sweet! my email address is ... So Fun!
Congrats, Valerie! I'll be contacting you to work out the details.
Valerie said...
Ohh I would love some! They are so sweet! my email address is ... So Fun!
Congrats, Valerie! I'll be contacting you to work out the details.
Thursday, October 1, 2009
Wallet Makeover
Looking for the Baby Shoe Giveaway? Click here. I'm taking entries until 11:59 PM MST tomorrow.
______________________________________________
I found this wallet on clearance for $3 the other day. I saw it, and immediately started thinking of the possiblities. I have been wanting to try Mod Podge on fabric, so I decided this was a good project to try it on.

First, cut out two different pieces of fabric about 1/2 inch bigger than the wallet on all sides.

Next, put Mod Podge on one side of the wallet, and then put the fabric on and smooth it out. Do this with both sides.


Use a razor blade to even out the edges of the fabric. Then, put Mod Podge on the fabric, and let it dry.

______________________________________________
I found this wallet on clearance for $3 the other day. I saw it, and immediately started thinking of the possiblities. I have been wanting to try Mod Podge on fabric, so I decided this was a good project to try it on.
First, cut out two different pieces of fabric about 1/2 inch bigger than the wallet on all sides.
Next, put Mod Podge on one side of the wallet, and then put the fabric on and smooth it out. Do this with both sides.
Use a razor blade to even out the edges of the fabric. Then, put Mod Podge on the fabric, and let it dry.
So quick and easy! If I could do it again I would have used a different fabric so I could decorate it. Maybe next time!

Tuesday, September 29, 2009
Baby Shoe Giveaway!!!
Time for my first giveaway! These sweet little shoes are made from my Mary Jane pattern, which happens to be my favorite. They are made of cotton fabric on the outside and wool felt on the inside to make it warm and comfy for baby. They have velcro closures, so they are adjustable. These shoes are size 3-6 months (4" long).

If you don't have a baby of your own to give them to, these would also be a great Christmas or baby shower present!
You have the chance to put in 4 entries!
#1 Leave a comment.
#2 Become a follower of my blog. If you are already a follower, let me know in a comment, and I will add you again.
#3 Put a link to my blog on your blog. Tell me you did so in another comment.
#4 Mention this giveaway on your blog with a link. Tell me you did so in another comment.
This giveaway will close Friday, October 2nd at 11:59 PM (MST).
Good luck!
Thursday, September 24, 2009
Button Headband
I love buttons! You can do so many things with them. The possibilities are endless! This headband took me about 10 minutes to make, and I think it is so cute! Make some for a little girl or yourself!

Here is what you need:
- 1 1/2 yards of stretch cord. This is the stretchy elastic cord that is used for some kinds of beading
- Buttons
- Clear fingernail polish
Start by measuring the head of whoever you're making the headband for, and add 2 inches. Cut 2 pieces of stretch cord. My daughter's head is 19", so I cut my cord 21". Measure 5" from the end of the cord, and tie a double square knot. Put some clear fingernail polish on the knot to hold it in place.

String your buttons on. If the buttons have 4 holes, string them diagonally. You want your buttons to overlap a little bit.
When you have about 5" of cord left, tie another double square knot, and put fingernail polish on it. Then, tie the ends together in a double square knot, put nail polish on the knot, and trim the edges.
This project inspired another button project that I'm so excited about! I'll post about it when I try it.
Monday, September 21, 2009
Art Board

My daughter loves art more than anything else. She's kind of like her mom. I was getting tired of having papers everywhere, and I wanted a way to display her special drawings. My husband actually came up with this idea. I was so proud! He is learning. I don't have step by step pictures of this one, but it is very simple, so I will just explain it.
You will need:
- A 6'X4' piece of particle board.
- Mod Podge
- 24 pieces of 12"X12" scrapbooking paper.
- Ribbbon
- Hot glue gun
1. Apply Mod Podge to the corner of the particle board (12"X12"). The key to Mod Podge is applying it evenly. If you miss a spot, the paper will bubble up. Place a sheet of scrapbooking paper on the mod podge. Rub the paper with your hands, starting in the center to get air bubbles out, and then apply Mod Podge on top of the paper. Repeat for the rest of the papers until the board is covered.
2. Cut 5 six foot long ribbons, and 7 four foot long ribbons. Using the hot glue gun, glue ribbon to the edges of the board and spaces between the paper. This will cover up any gaps in the paper, and make the board look more finished. Put the ribbons on the inside of the board first, and then the outside ones so you can cover up the ends of the ribbons.
That's it! Now you can hang up art work! We use putty to hang up pictures so we don't have holes in the board.
Friday, September 18, 2009
Tank Top into Girl's Shirt
Here is my first tutorial! This little shirt turned out so cute. I'm excited to share it with you!
 I am really into refashioning lately. It is so fun to create something out of something else. A couple weeks ago I was at Old Navy, and saw some things on clearance for $.97. I wouldn't wear any of them myself, but I love a good deal, and so many of the clothes had so much POTENTIAL! One of the things I bought was this tank top.


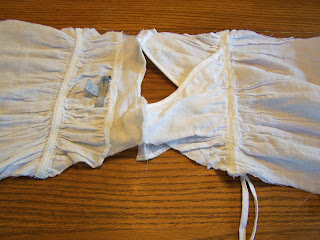 Spread out your shirt as shown in the picture above, and trace along the inside of where the sleeves will go. This will help you make a sleeve pattern. Once you have your pattern, cut out two sleeves from scrap fabric.
 I am really into refashioning lately. It is so fun to create something out of something else. A couple weeks ago I was at Old Navy, and saw some things on clearance for $.97. I wouldn't wear any of them myself, but I love a good deal, and so many of the clothes had so much POTENTIAL! One of the things I bought was this tank top.
Get a shirt the same size you want your new shirt to be, fold it in half, and trace around it (don't trace around the sleeves). Fold your paper on the fold line of the shirt, and cut it out. You now have a pattern!
Place your pattern on your tank top. Make sure the shirt is lying flat in the front and back. Pin the pattern in place and cut it out. Cut about 1/2 inch extra around the pattern to allow room for seam allowance. Pay attention to how much fabric there is in the back of the tank top vs. the front! See how my back piece is different than the front? OOPS!!! It was easily fixed by cutting out the top part of the pattern and sewing it to the back of the shirt.

 That's better!
Next, you will need to take care of any raw edges on the neck of your shirt. The front of my neck was finished, but the back wasn't. Cut a piece of the scrap fabric about 1" wide, and as long as the neck line. Iron longways one edge of the fabric to the middle, and then the other so both edges meet in the middle.
Fold in half longways where the edges meet, and iron again. You have now made your own bias tape. Fold bias tape over the raw edge of the neck, pin in place, and sew.
Now, put your two pieces right sides together, and sew the shoulder pieces together.
Spread out your shirt as shown in the picture above, and trace along the inside of where the sleeves will go. This will help you make a sleeve pattern. Once you have your pattern, cut out two sleeves from scrap fabric.
Finish off raw edges of the straight edges of the sleeves. You can do this the same way you did the neck, or you can hem it by folding a small amount over, folding it over again, and sewing.
Fold sleeve in half, and match up the middle of the sleeve to the shoulder seam of your shirt. Pin the sleeve to the shirt, and sew.
 Once you have your sleeves on, put right sides of the shirt together, and pin along the sides including the armpit of the sleeve. Sew sides together.

If the shirt fits over your little one's head, you're done! If not, you still have one more step. Make a slit in the back of the shirt. Make some more bias tape as shown above, and sew onto the raw edges of the slit. Take a smaller piece of bias tape, make a loop, and sew to the top of the shirt. Sew on button.
Congratulations! You now have an adorable little girls' shirt!!!
Subscribe to:
Posts (Atom)