
 I am really into refashioning lately. It is so fun to create something out of something else. A couple weeks ago I was at Old Navy, and saw some things on clearance for $.97. I wouldn't wear any of them myself, but I love a good deal, and so many of the clothes had so much POTENTIAL! One of the things I bought was this tank top.


 That's better!
Next, you will need to take care of any raw edges on the neck of your shirt. The front of my neck was finished, but the back wasn't. Cut a piece of the scrap fabric about 1" wide, and as long as the neck line. Iron longways one edge of the fabric to the middle, and then the other so both edges meet in the middle.


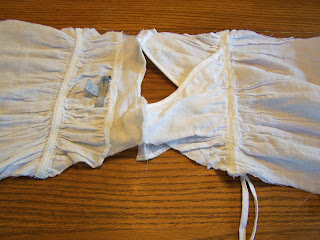 Spread out your shirt as shown in the picture above, and trace along the inside of where the sleeves will go. This will help you make a sleeve pattern. Once you have your pattern, cut out two sleeves from scrap fabric.
Finish off raw edges of the straight edges of the sleeves. You can do this the same way you did the neck, or you can hem it by folding a small amount over, folding it over again, and sewing.
Fold sleeve in half, and match up the middle of the sleeve to the shoulder seam of your shirt. Pin the sleeve to the shirt, and sew.
 Once you have your sleeves on, put right sides of the shirt together, and pin along the sides including the armpit of the sleeve. Sew sides together.

If the shirt fits over your little one's head, you're done! If not, you still have one more step. Make a slit in the back of the shirt. Make some more bias tape as shown above, and sew onto the raw edges of the slit. Take a smaller piece of bias tape, make a loop, and sew to the top of the shirt. Sew on button.
Congratulations! You now have an adorable little girls' shirt!!!
Super cute shirt! I am excited to see what other creations you come up with!
ReplyDeleteYAY! I love it!!!
ReplyDeleteTAYA! You are even more amazing than I thought you were! You have a great gift for that! Can't wait to see more!
ReplyDeleteWow!!! How do you find time for all you do?? You are amazing! This shirt is adorable!
ReplyDeleteAdorable!!! I never would have thought of anything like that!
ReplyDelete